

Over the last few years, crafting and cardmaking has witnessed a huge rise in popularity, and as a result it is great to see that crafting products are appearing in more and more of the usual high street shops, instead of the need to hunt down the little craft nooks which usually required a significant level of skill and patience. Today i am going to share with you a quick and easy technique with one of the more readily available craft products – foam. Of course i don’t mean the shaving foam, or bath foam variety but the squishy flat sheets that are often used in primary schools as an fun alternative to paper. It is sometimes referred to as ‘craft foam’ or ‘funky foam’ and can sometimes be found already cut into shapes and letters as well as the standard sheets.
When i first started crafting and cardmaking i bought an abundance of this foam, and as my skills progressed, i began to move away from using this medium, as in my mind i associated it with kids craft and therefore did not have the ‘professional’ look that i was wanted to achieve. If you’ve been down this path, then you too probably have a pile of funky foam lying dormant in a drawer somewhere. Well, now its time for them to resurface, as i am going to tell you all about a quick and easy technique using funky foam that looks great on cards and is a great way to make your own embellishments for scrapbook layouts and other craft projects. Lets get started…
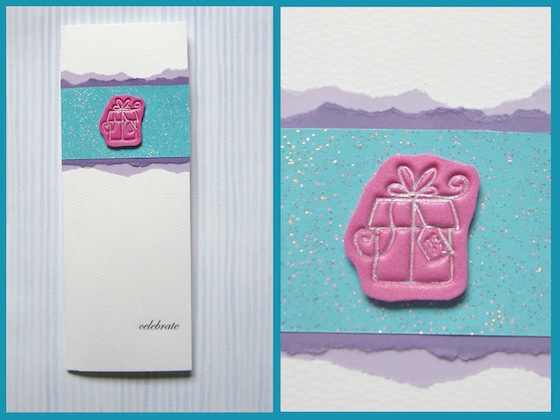
You will need a piece of funky foam, a rubber stamp, embossing ink pad and a heat gun. First cut a piece of funky foam slightly larger than your stamp design, then prepare your stamp by inking it up with the embossing ink. Then using a heat gun, gently heat the foam. You will see the foam start to glisten as the molecules heat up. Remember to hold the heat gun at least 6 inches away from the foam and also ensure that you are using a heat resistant surface to work upon. As soon as you turn off the heat gun, quickly take the stamp and press it into the foam. You will want to apply as much pressure as possible and hold it firmly in place until the foam has cooled completely. This may take 3-4 minutes. Although the embossing ink is clear, it acts as a release so that when you want to lift the stamp away from the foam, it does so easily. The result is quite magnificent in that the stamp has left an image in the foam that is interesting, tactile and will give great dimension to the finished project. Then take your scissors and trim around the design neatly, and using double sided sticky tape glue your funky foam embellishment in place. You should definitely try this technique on brown coloured funky foam, as the result looks uncannily like leather which is great for a more masculine feel.
TIP: why not use coloured ink instead of embossing ink to reinforce the design and add a little more colour to the embellishment.
Embossing on Foam
on October 12, 2008Next post: Pretty Darn Quick Journaling pads
Previous post: Basic Grey Rub On Tool


http://levitra.eus/# п»їLevitra price
http://kamagra.icu/# buy Kamagra
https://levitra.eus/# Levitra 20 mg for sale
Kamagra 100mg [url=http://kamagra.icu/#]sildenafil oral jelly 100mg kamagra[/url] sildenafil oral jelly 100mg kamagra
viagra without prescription Viagra online price or cheapest viagra
http://tournamenttownusa.com/__media__/js/netsoltrademark.php?d=viagra.eus over the counter sildenafil
[url=http://greenbitches.com/__media__/js/netsoltrademark.php?d=viagra.eus]sildenafil online[/url] order viagra and [url=http://xunshang.cc/home.php?mod=space&uid=4241335]Order Viagra 50 mg online[/url] Generic Viagra for sale
buy Kamagra Kamagra tablets or buy kamagra online usa
http://caboluxuryretreats.com/__media__/js/netsoltrademark.php?d=kamagra.icu buy kamagra online usa
[url=http://www.leanbuild.org/__media__/js/netsoltrademark.php?d=kamagra.icu]Kamagra tablets[/url] sildenafil oral jelly 100mg kamagra and [url=http://www.xiaolanmb.com/space-uid-18002.html]Kamagra tablets[/url] buy kamagra online usa
Cialis 20mg price in USA Generic Tadalafil 20mg price or Cialis over the counter
http://newbraunfelsnaturally.com/__media__/js/netsoltrademark.php?d=cialis.foundation cialis for sale
[url=http://www.ultracarestaffing.com/__media__/js/netsoltrademark.php?d=cialis.foundation]Tadalafil Tablet[/url] Cheap Cialis and [url=http://xunshang.cc/home.php?mod=space&uid=4241527]Generic Cialis without a doctor prescription[/url] Cialis 20mg price in USA
Buy generic Levitra online [url=https://levitra.eus/#]Buy Levitra 20mg online[/url] Levitra online USA fast
buy viagra here sildenafil over the counter or Viagra online price
http://sportingeyes.net/__media__/js/netsoltrademark.php?d=viagra.eus best price for viagra 100mg
[url=http://www.judystorey.com/__media__/js/netsoltrademark.php?d=viagra.eus]Cheap Viagra 100mg[/url] buy Viagra online and [url=http://www.wjyjh.cn/home.php?mod=space&uid=10010]order viagra[/url] Viagra online price
https://cialis.foundation/# Cialis 20mg price in USA
cheap viagra [url=https://viagra.eus/#]sildenafil 50 mg price[/url] Buy generic 100mg Viagra online
https://kamagra.icu/# Kamagra 100mg
Buy Tadalafil 20mg cialis for sale or Tadalafil price
http://www.lancersi.com/__media__/js/netsoltrademark.php?d=cialis.foundation Generic Cialis without a doctor prescription
[url=http://spectorgadon.com/__media__/js/netsoltrademark.php?d=cialis.foundation]Cialis over the counter[/url] Cialis without a doctor prescription and [url=http://bbs.cheaa.com/home.php?mod=space&uid=2985467]Cheap Cialis[/url] Tadalafil price
http://kamagra.icu/# Kamagra 100mg price
http://cialis.foundation/# Generic Tadalafil 20mg price
buy cialis pill [url=http://cialis.foundation/#]Generic Tadalafil 20mg price[/url] Generic Cialis price
https://levitra.eus/# Cheap Levitra online
Cialis over the counter [url=http://cialis.foundation/#]Buy Tadalafil 20mg[/url] Buy Tadalafil 10mg
https://kamagra.icu/# Kamagra Oral Jelly
buy viagra here Buy generic 100mg Viagra online or buy Viagra over the counter
http://chandaprint.net/__media__/js/netsoltrademark.php?d=viagra.eus Generic Viagra online
[url=http://retail-wire.com/__media__/js/netsoltrademark.php?d=viagra.eus]over the counter sildenafil[/url] Buy Viagra online cheap and [url=https://kwik.adriensosa.fr/forums/users/xqztqfdzdc/]best price for viagra 100mg[/url] buy Viagra online
Generic Cialis price Buy Cialis online or Cialis without a doctor prescription
http://wclturfwars.info/__media__/js/netsoltrademark.php?d=cialis.foundation Tadalafil Tablet
[url=http://fortworthrugcleaning.com/__media__/js/netsoltrademark.php?d=cialis.foundation]Generic Cialis without a doctor prescription[/url] Cialis 20mg price and [url=http://www.9kuan9.com/home.php?mod=space&uid=145693]Generic Cialis price[/url] Tadalafil Tablet
cheap kamagra [url=https://kamagra.icu/#]cheap kamagra[/url] Kamagra Oral Jelly
http://kamagra.icu/# Kamagra 100mg
india pharmacy mail order: indian pharmacies safe – best online pharmacy india indiapharmacy.pro
canada drugs online reviews: canada rx pharmacy world – canada pharmacy 24h canadapharmacy.guru
canadian pharmacies compare [url=http://canadapharmacy.guru/#]best canadian pharmacy to order from[/url] onlinecanadianpharmacy canadapharmacy.guru
canadian pharmacy scam: canadian pharmacy 24 com – vipps approved canadian online pharmacy canadapharmacy.guru
mexican online pharmacies prescription drugs: mexican pharmaceuticals online – п»їbest mexican online pharmacies mexicanpharmacy.company
canada pharmacy reviews [url=https://canadapharmacy.guru/#]canada drugs online[/url] canada drugs canadapharmacy.guru
canadian world pharmacy: canada drug pharmacy – canadian pharmacy world reviews canadapharmacy.guru
https://mexicanpharmacy.company/# pharmacies in mexico that ship to usa mexicanpharmacy.company
http://canadapharmacy.guru/# canadian pharmacy service canadapharmacy.guru
mexico drug stores pharmacies: mexican border pharmacies shipping to usa – mexico pharmacy mexicanpharmacy.company
canadian pharmacy in canada: reputable canadian pharmacy – onlinecanadianpharmacy canadapharmacy.guru
canadian pharmacy online [url=https://canadapharmacy.guru/#]drugs from canada[/url] ordering drugs from canada canadapharmacy.guru
indianpharmacy com online shopping pharmacy india or india pharmacy mail order
http://thebusinessofstyle.com/__media__/js/netsoltrademark.php?d=indiapharmacy.pro top 10 online pharmacy in india
[url=http://world-cultures.net/__media__/js/netsoltrademark.php?d=indiapharmacy.pro]online pharmacy india[/url] canadian pharmacy india and [url=http://www.wjyjh.cn/home.php?mod=space&uid=10385]mail order pharmacy india[/url] top 10 online pharmacy in india
п»їbest mexican online pharmacies mexico drug stores pharmacies or buying prescription drugs in mexico
http://lostsecuritiesbondnet.com/__media__/js/netsoltrademark.php?d=mexicanpharmacy.company mexican drugstore online
[url=http://myciragan.net/__media__/js/netsoltrademark.php?d=mexicanpharmacy.company]reputable mexican pharmacies online[/url] best online pharmacies in mexico and [url=http://83783.net/home.php?mod=space&uid=7595514]mexico pharmacies prescription drugs[/url] mexico drug stores pharmacies
indian pharmacies safe: india pharmacy – reputable indian pharmacies indiapharmacy.pro
canada online pharmacy canadian online drugs or canadianpharmacymeds
http://swiftletsoftware.com/__media__/js/netsoltrademark.php?d=canadapharmacy.guru canada discount pharmacy
[url=http://myvietnamvisa.net/__media__/js/netsoltrademark.php?d=canadapharmacy.guru]canada pharmacy 24h[/url] canadian drug stores and [url=http://www.viczz.com/home.php?mod=space&uid=2696516]escrow pharmacy canada[/url] canadian discount pharmacy
canadian pharmacy checker: canada discount pharmacy – canadian pharmacy canadapharmacy.guru
best india pharmacy [url=https://indiapharmacy.pro/#]indian pharmacy online[/url] cheapest online pharmacy india indiapharmacy.pro
canadian online pharmacy canadianpharmacyworld or canada drugs reviews
http://cannabusatx.com/__media__/js/netsoltrademark.php?d=canadapharmacy.guru precription drugs from canada
[url=http://salterra.com/__media__/js/netsoltrademark.php?d=canadapharmacy.guru]my canadian pharmacy[/url] canadian pharmacy 24 and [url=https://tc.yuedotech.com/home.php?mod=space&uid=295649]safe canadian pharmacies[/url] canadapharmacyonline
https://indiapharmacy.pro/# buy medicines online in india indiapharmacy.pro
canadian pharmacy king reviews: legitimate canadian pharmacy online – the canadian drugstore canadapharmacy.guru
northwest canadian pharmacy: canadian pharmacy review – canadian pharmacy 24h com safe canadapharmacy.guru
best online pharmacies in mexico: п»їbest mexican online pharmacies – mexican rx online mexicanpharmacy.company
maple leaf pharmacy in canada [url=http://canadapharmacy.guru/#]reliable canadian pharmacy[/url] canadian pharmacy uk delivery canadapharmacy.guru
top 10 pharmacies in india top 10 pharmacies in india or indian pharmacies safe
http://btinstitute.net/__media__/js/netsoltrademark.php?d=indiapharmacy.pro india pharmacy
[url=http://acasreit.net/__media__/js/netsoltrademark.php?d=indiapharmacy.pro]indian pharmacy[/url] india online pharmacy and [url=http://www.9kuan9.com/home.php?mod=space&uid=149435]top 10 online pharmacy in india[/url] indian pharmacy
http://mexicanpharmacy.company/# mexican rx online mexicanpharmacy.company
https://canadapharmacy.guru/# canadian pharmacy online store canadapharmacy.guru
medication from mexico pharmacy mexican pharmaceuticals online or reputable mexican pharmacies online
http://quadrilledesign.com/__media__/js/netsoltrademark.php?d=mexicanpharmacy.company mexico drug stores pharmacies
[url=http://ringscribble.com/__media__/js/netsoltrademark.php?d=mexicanpharmacy.company]mexico drug stores pharmacies[/url] mexican drugstore online and [url=http://www.donggoudi.com/home.php?mod=space&uid=46933]mexican mail order pharmacies[/url] mexican drugstore online
top online pharmacy india: best india pharmacy – best online pharmacy india indiapharmacy.pro
pharmacy website india: reputable indian pharmacies – reputable indian pharmacies indiapharmacy.pro
best online canadian pharmacy [url=https://canadapharmacy.guru/#]canadian pharmacy online[/url] canadian pharmacy price checker canadapharmacy.guru
canadian pharmacy online ship to usa canadian online pharmacy reviews or canadian discount pharmacy
http://thesalonatthecollege.com/__media__/js/netsoltrademark.php?d=canadapharmacy.guru prescription drugs canada buy online
[url=http://ruakaka.com/__media__/js/netsoltrademark.php?d=canadapharmacy.guru]canadian pharmacy no scripts[/url] online pharmacy canada and [url=http://bbs.cheaa.com/home.php?mod=space&uid=2990098]canadian pharmacy world reviews[/url] canadian pharmacy world
https://indiapharmacy.pro/# indian pharmacy paypal indiapharmacy.pro
best online pharmacies in mexico: п»їbest mexican online pharmacies – buying prescription drugs in mexico mexicanpharmacy.company
п»їbest mexican online pharmacies: buying from online mexican pharmacy – buying prescription drugs in mexico online mexicanpharmacy.company
india online pharmacy [url=http://indiapharmacy.pro/#]reputable indian online pharmacy[/url] indian pharmacy online indiapharmacy.pro
online pharmacy india indian pharmacy paypal or best india pharmacy
http://outofurban.com/__media__/js/netsoltrademark.php?d=indiapharmacy.pro india online pharmacy
[url=http://flibertyjibbet.com/__media__/js/netsoltrademark.php?d=indiapharmacy.pro]reputable indian online pharmacy[/url] indian pharmacies safe and [url=https://forex-bitcoin.com/members/298621-brdqaruqjg]best india pharmacy[/url] indianpharmacy com
77 canadian pharmacy canadian king pharmacy or certified canadian international pharmacy
http://ic4salesforce.com/__media__/js/netsoltrademark.php?d=canadapharmacy.guru thecanadianpharmacy
[url=http://michael-andrews.com/__media__/js/netsoltrademark.php?d=canadapharmacy.guru]canadian pharmacy[/url] canadian online pharmacy reviews and [url=http://bbs.zhizhuyx.com/home.php?mod=space&uid=8846617]legit canadian online pharmacy[/url] buying from canadian pharmacies
india pharmacy mail order: online shopping pharmacy india – reputable indian pharmacies indiapharmacy.pro
http://mexicanpharmacy.company/# purple pharmacy mexico price list mexicanpharmacy.company
https://indiapharmacy.pro/# top 10 online pharmacy in india indiapharmacy.pro
best india pharmacy: cheapest online pharmacy india – top online pharmacy india indiapharmacy.pro
reputable canadian online pharmacy [url=https://canadapharmacy.guru/#]canadian pharmacy uk delivery[/url] pharmacy canadian canadapharmacy.guru
mexico pharmacies prescription drugs buying prescription drugs in mexico or reputable mexican pharmacies online
http://obsoletefleet.com/__media__/js/netsoltrademark.php?d=mexicanpharmacy.company п»їbest mexican online pharmacies
[url=http://monicaworline.info/__media__/js/netsoltrademark.php?d=mexicanpharmacy.company]mexican border pharmacies shipping to usa[/url] mexican border pharmacies shipping to usa and [url=http://qihuo.org.cn/space-uid-264792.html]п»їbest mexican online pharmacies[/url] mexican pharmaceuticals online
best india pharmacy: reputable indian pharmacies – top 10 pharmacies in india indiapharmacy.pro
best mail order pharmacy canada reliable canadian pharmacy or canadian drug prices
http://alanaboud.com/__media__/js/netsoltrademark.php?d=canadapharmacy.guru canadian pharmacy antibiotics
[url=http://faith4work.com/__media__/js/netsoltrademark.php?d=canadapharmacy.guru]canada pharmacy online[/url] canada ed drugs and [url=http://plixsite.net/forum/member.php?action=profile&uid=2467286]canadian pharmacy scam[/url] canadian pharmacy online store
https://mexicanpharmacy.company/# buying from online mexican pharmacy mexicanpharmacy.company
reputable mexican pharmacies online: purple pharmacy mexico price list – mexico pharmacies prescription drugs mexicanpharmacy.company
This outstanding and limited compilation of NFTs carries the potential to transform into one of the
most lucrative investment endeavors to date!
india online pharmacy canadian pharmacy india or indian pharmacy paypal
http://energyusapropaneandoil.com/__media__/js/netsoltrademark.php?d=indiapharmacy.pro online shopping pharmacy india
[url=http://goalsoutloud.com/__media__/js/netsoltrademark.php?d=indiapharmacy.pro]cheapest online pharmacy india[/url] buy medicines online in india and [url=https://visualchemy.gallery/forum/profile.php?id=3199874]cheapest online pharmacy india[/url] online shopping pharmacy india
medicine in mexico pharmacies: mexican border pharmacies shipping to usa – purple pharmacy mexico price list mexicanpharmacy.company
canadian compounding pharmacy [url=http://canadapharmacy.guru/#]canadian drug stores[/url] is canadian pharmacy legit canadapharmacy.guru
https://indiapharmacy.pro/# indian pharmacy paypal indiapharmacy.pro
canadian pharmacy service canadian mail order pharmacy or canadian drugs pharmacy
http://paulafalzone.com/__media__/js/netsoltrademark.php?d=canadapharmacy.guru best online canadian pharmacy
[url=http://greatmusicgames.net/__media__/js/netsoltrademark.php?d=canadapharmacy.guru]canadianpharmacymeds com[/url] canadianpharmacyworld com and [url=https://quantrinet.com/forum/member.php?u=534324]canadianpharmacyworld com[/url] escrow pharmacy canada
https://canadapharmacy.guru/# canada pharmacy canadapharmacy.guru
online canadian drugstore: ed meds online canada – canadian discount pharmacy canadapharmacy.guru
best online pharmacy india [url=https://indiapharmacy.pro/#]indianpharmacy com[/url] india online pharmacy indiapharmacy.pro
buying from online mexican pharmacy buying prescription drugs in mexico online or mexican mail order pharmacies
http://onlinecollegetours.com/__media__/js/netsoltrademark.php?d=mexicanpharmacy.company buying prescription drugs in mexico
[url=http://www.servi-cycle.com/__media__/js/netsoltrademark.php?d=mexicanpharmacy.company]mexican drugstore online[/url] pharmacies in mexico that ship to usa and [url=http://www.mmecaw.com/home.php?mod=space&uid=446737]reputable mexican pharmacies online[/url] best online pharmacies in mexico
best online pharmacies in mexico: mexican pharmacy – pharmacies in mexico that ship to usa mexicanpharmacy.company
mexican mail order pharmacies: pharmacies in mexico that ship to usa – buying from online mexican pharmacy mexicanpharmacy.company
http://mexicanpharmacy.company/# mexico drug stores pharmacies mexicanpharmacy.company
canadian pharmacy scam canadian pharmacy no rx needed or the canadian pharmacy
http://myveteranoptions.com/__media__/js/netsoltrademark.php?d=canadapharmacy.guru pharmacy canadian superstore
[url=http://sexymasks.com/__media__/js/netsoltrademark.php?d=canadapharmacy.guru]best canadian pharmacy online[/url] certified canadian international pharmacy and [url=http://www.wjyjh.cn/home.php?mod=space&uid=10379]safe canadian pharmacies[/url] reputable canadian online pharmacies
reputable indian online pharmacy cheapest online pharmacy india or indian pharmacies safe
http://2laguardia.com/__media__/js/netsoltrademark.php?d=indiapharmacy.pro mail order pharmacy india
[url=http://letsrollmusic.org/__media__/js/netsoltrademark.php?d=indiapharmacy.pro]top 10 pharmacies in india[/url] india pharmacy and [url=http://plixsite.net/forum/member.php?action=profile&uid=2467169]pharmacy website india[/url] indian pharmacy
best online pharmacy india: reputable indian pharmacies – reputable indian pharmacies indiapharmacy.pro
canadian pharmacy india [url=https://indiapharmacy.pro/#]reputable indian pharmacies[/url] cheapest online pharmacy india indiapharmacy.pro
https://canadapharmacy.guru/# rate canadian pharmacies canadapharmacy.guru
canadadrugpharmacy com: online canadian pharmacy reviews – pharmacy wholesalers canada canadapharmacy.guru
http://canadapharmacy.guru/# thecanadianpharmacy canadapharmacy.guru
reputable indian online pharmacy: indian pharmacy online – india online pharmacy indiapharmacy.pro
best canadian pharmacy buying drugs from canada or my canadian pharmacy review
http://linnstar.net/__media__/js/netsoltrademark.php?d=canadapharmacy.guru best online canadian pharmacy
[url=http://team-placement.com/__media__/js/netsoltrademark.php?d=canadapharmacy.guru]escrow pharmacy canada[/url] canadian mail order pharmacy and [url=http://www.28tongji.com/space-uid-993307.html]canadian king pharmacy[/url] legitimate canadian pharmacy
top online pharmacy india: indian pharmacy paypal – reputable indian pharmacies indiapharmacy.pro
purple pharmacy mexico price list [url=https://mexicanpharmacy.company/#]mexican online pharmacies prescription drugs[/url] mexican rx online mexicanpharmacy.company
mexico drug stores pharmacies mexico pharmacies prescription drugs or mexican drugstore online
http://vuzixsmartglasses.com/__media__/js/netsoltrademark.php?d=mexicanpharmacy.company mexico drug stores pharmacies
[url=http://sashaslegs.com/__media__/js/netsoltrademark.php?d=mexicanpharmacy.company]best online pharmacies in mexico[/url] mexican pharmaceuticals online and [url=http://www.fxwenxue.com/home.php?mod=space&uid=668344]medication from mexico pharmacy[/url] buying prescription drugs in mexico
https://indiapharmacy.pro/# india online pharmacy indiapharmacy.pro
top 10 pharmacies in india canadian pharmacy india or cheapest online pharmacy india
http://outdoorzeppelin.com/__media__/js/netsoltrademark.php?d=indiapharmacy.pro indian pharmacy online
[url=http://oneturnberryplace.us/__media__/js/netsoltrademark.php?d=indiapharmacy.pro]п»їlegitimate online pharmacies india[/url] india pharmacy mail order and [url=http://www.118btc.com/home.php?mod=space&uid=675148]online shopping pharmacy india[/url] india online pharmacy
canadian pharmacy world: precription drugs from canada – canada rx pharmacy world canadapharmacy.guru
indian pharmacy online: cheapest online pharmacy india – top online pharmacy india indiapharmacy.pro
pharmacy wholesalers canada [url=https://canadapharmacy.guru/#]my canadian pharmacy reviews[/url] legitimate canadian online pharmacies canadapharmacy.guru
canadian pharmacies comparison best canadian pharmacy or canadian online pharmacy
http://hotubthings.com/__media__/js/netsoltrademark.php?d=canadapharmacy.guru canada pharmacy online
[url=http://winaday.org/__media__/js/netsoltrademark.php?d=canadapharmacy.guru]canada drug pharmacy[/url] canada drugs online and [url=http://www.mmecaw.com/home.php?mod=space&uid=446612]canadian pharmacy sarasota[/url] canada rx pharmacy world
https://mexicanpharmacy.company/# best online pharmacies in mexico mexicanpharmacy.company
mexico pharmacies prescription drugs: medication from mexico pharmacy – buying from online mexican pharmacy mexicanpharmacy.company
where can i get generic clomid pills: cost of cheap clomid without a prescription – can i purchase clomid now
https://amoxil.world/# amoxicillin 500mg cost
http://prednisone.digital/# prednisone cream
can i purchase generic clomid [url=https://clomid.sbs/#]can you buy cheap clomid no prescription[/url] order clomid without dr prescription
prednisone 500 mg tablet: can you buy prednisone in canada – 15 mg prednisone daily
http://prednisone.digital/# prednisone generic brand name
http://prednisone.digital/# prednisone 50 mg price
buying propecia online [url=http://propecia.sbs/#]buy cheap propecia pills[/url] cost of propecia without prescription
prednisone best price: prednisone uk – prednisone 10 mg tablets
canadian pharmacy amoxicillin: amoxicillin 500mg buy online canada – amoxicillin 250 mg price in india
http://doxycycline.sbs/# doxycycline generic
http://amoxil.world/# where can i buy amoxicillin over the counter uk
doxycycline hyc [url=https://doxycycline.sbs/#]buy doxycycline without prescription uk[/url] buy doxycycline without prescription
propecia generics: propecia generic – cost generic propecia prices
buy cheap doxycycline online: buy doxycycline monohydrate – doxycycline without a prescription
cheap propecia without a prescription cost generic propecia without a prescription or cost propecia without rx
https://images.google.com.ai/url?q=https://propecia.sbs generic propecia price
[url=https://www.google.iq/url?q=https://propecia.sbs]order generic propecia without dr prescription[/url] buying generic propecia without rx and [url=https://masterbationtube.com/user/giefbsazxs/videos]buying propecia without a prescription[/url] generic propecia no prescription
http://clomid.sbs/# where can i get clomid
prednisone tablets 2.5 mg prednisone for sale no prescription or order prednisone 100g online without prescription
http://906090.4-germany.de/tools/klick.php?curl=http://prednisone.digital prednisone 500 mg tablet
[url=https://www.kirschenmarkt-gladenbach.de/go.php?go=https://prednisone.digital]prednisone 40 mg price[/url] prednisone 5 50mg tablet price and [url=http://bbs.cheaa.com/home.php?mod=space&uid=2995057]3000mg prednisone[/url] canada pharmacy prednisone
https://clomid.sbs/# how can i get generic clomid without insurance
buy generic clomid pill [url=http://clomid.sbs/#]can you get cheap clomid prices[/url] where can i buy clomid without insurance
where to get clomid price: can i order generic clomid price – where can i buy clomid without a prescription
buy amoxicillin 500mg canada amoxicillin 500 tablet or amoxicillin price canada
http://ccasayourworld.com/?URL=amoxil.world amoxicillin 500mg tablets price in india
[url=https://www.google.ee/url?q=https://amoxil.world]how to get amoxicillin[/url] amoxicillin 500mg tablets price in india and [url=https://forexzloty.pl/members/331420-aejoysjjnf]azithromycin amoxicillin[/url] cost of amoxicillin
https://propecia.sbs/# propecia order
propecia pill: cost propecia without a prescription – buying propecia without rx
https://doxycycline.sbs/# 100mg doxycycline
can i order cheap clomid pills [url=http://clomid.sbs/#]can i order cheap clomid without rx[/url] where can i buy clomid without prescription
cheap propecia prices get propecia online or cost generic propecia without rx
https://www.google.com.cu/url?sa=t&url=https://propecia.sbs cost of generic propecia for sale
[url=https://cse.google.ml/url?q=https://propecia.sbs]buy generic propecia without a prescription[/url] buy propecia no prescription and [url=https://kwik.adriensosa.fr/forums/users/ijxdwyehtd/]buying generic propecia tablets[/url] how cЙ‘n i get cheap propecia pills
http://propecia.sbs/# cost generic propecia online
https://amoxil.world/# buy cheap amoxicillin
doxycycline 100mg dogs [url=https://doxycycline.sbs/#]order doxycycline[/url] doxycycline 100 mg
prednisone otc uk: prednisone purchase canada – prednisone online pharmacy
Continue the Conversation! The address for Wheeling Island Hotel-Casino-Racetrack is 1 S Stone St, Wheeling, West Virginia 26003 Wheeling Island Casino is a popular destination for live entertainment, featuring performances by national acts and local bands in its showroom. There are 3 restaurants on site, as well as a coffee shop cafΘ and a nearby snack bar deli. You can unwind with a drink at one of the 3 bars lounges. A computer station is on site, and both WiFi and wired Internet are free in public spaces. A casino, vending machine, and Sports book are also featured at Wheeling Island Hotel-Casino-Racetrack. Self parking is free. Smoking is allowed in designated areas at this 3.5-star Wheeling hotel. The casino served as the site of the Wheeling Jamboree from fall 2012 to 2015.
https://clubwarpworld.blogspot.com/2018/10/amateurcfnm-victoria-pure-exam-liberties.html
The Golden Compass is our most prestigious award. For a casino to receive this award, it must excel in every possible domain. When you play at a Golden Compass casino, you are playing at the very best in the industry. Casino bonuses are a popular part of the online gambling ecosystem, offered by most online casino websites. Here, you can learn more about bonuses offered by Bobby Casino. There are many different types of casino bonuses, such as welcome bonuses, deposit bonuses, no deposit bonuses, free spins, bonus codes, loyalty programs, and more. Specific bonuses for new or existing players and their conditions are listed above, but feel free to keep reading to learn more. Yes, the casino is very safe. It has a great reputation in the industry and is one of our most popular casinos to date. It also uses KYC verification to identify and verify customers.